Hi all, 由於最近有再研究原生 terminal Vim 的關係,固有這邊文章,由於本人此次研究是以撰寫typescript 為出發點,以下設定皆為tyescript相關設定,但其他程式語言也可參考,由於本次文章是解說如何自定義 Code Action,一些基本的設定就不再多做贅述。
那這篇文章主要會解說如何自定義 Code Action。我自己是選用 NvChad 進行修改,因此主要的 vim 會是使用NeoVim, 且 Plugin Manager 會是 Lazy 為主(但其實背後與 Packer 差不多,因此Packer 玩家也可參考)
以下是我的設定環境:
OS: Mac Air (M2)
NeoVim: v0.10.2
Need nodeJs/npm
Lsp: ts_ls
環境依賴
首先能我們必須安裝以下這樣個套件:
nvim-lspconfig : 這個套件主要會連線到 Language Server (lsp) ,其目的就是替 Vim 導入不同程式語言的支援,那我們之後要設定的 code action 也會是吃這邊的設定。
接著我們就要替 vim 安裝特定的 lsp (我是以ts_ls 作為目標)我們可以再vim 裡頭輸入以下指令: LspInstall ts_ls
安裝玩之後,跳回到終端機介面並使用 npm 安裝相關套件npm install typescript-lanuage
以上步驟完成後,方可進入下一階段
設定 lsp-config
此時我們再 ~/.config/nvim/ 資料夾底下應該會長像這樣
.
├── LICENSE
├── README.md
├── init.lua
├── lazy-lock.json
└── lua
    ├── chadrc.lua
    ├── configs
    ├── mappings.lua
    ├── options.lua
    └── plugins
接著我們需要再configs 資料夾內建立一個新資料夾用來存放我們定義code action的地方(資料夾名稱我這命名為codeActions)。
此時也會在 plugins/init.lua 設定當lsp-config的細節設定需要印入 configs/lsp-config.lua 這一份文件,詳細的內容設定可參考官方 repo ,以下將針對code action做解說。
理解 code action
所謂的 code action 就是透過 lsp 給定當前的code 的相關訊息,來判定說可以提供的動作。 以此文章目標為例,當我們今天再code 裡面這樣子撰寫
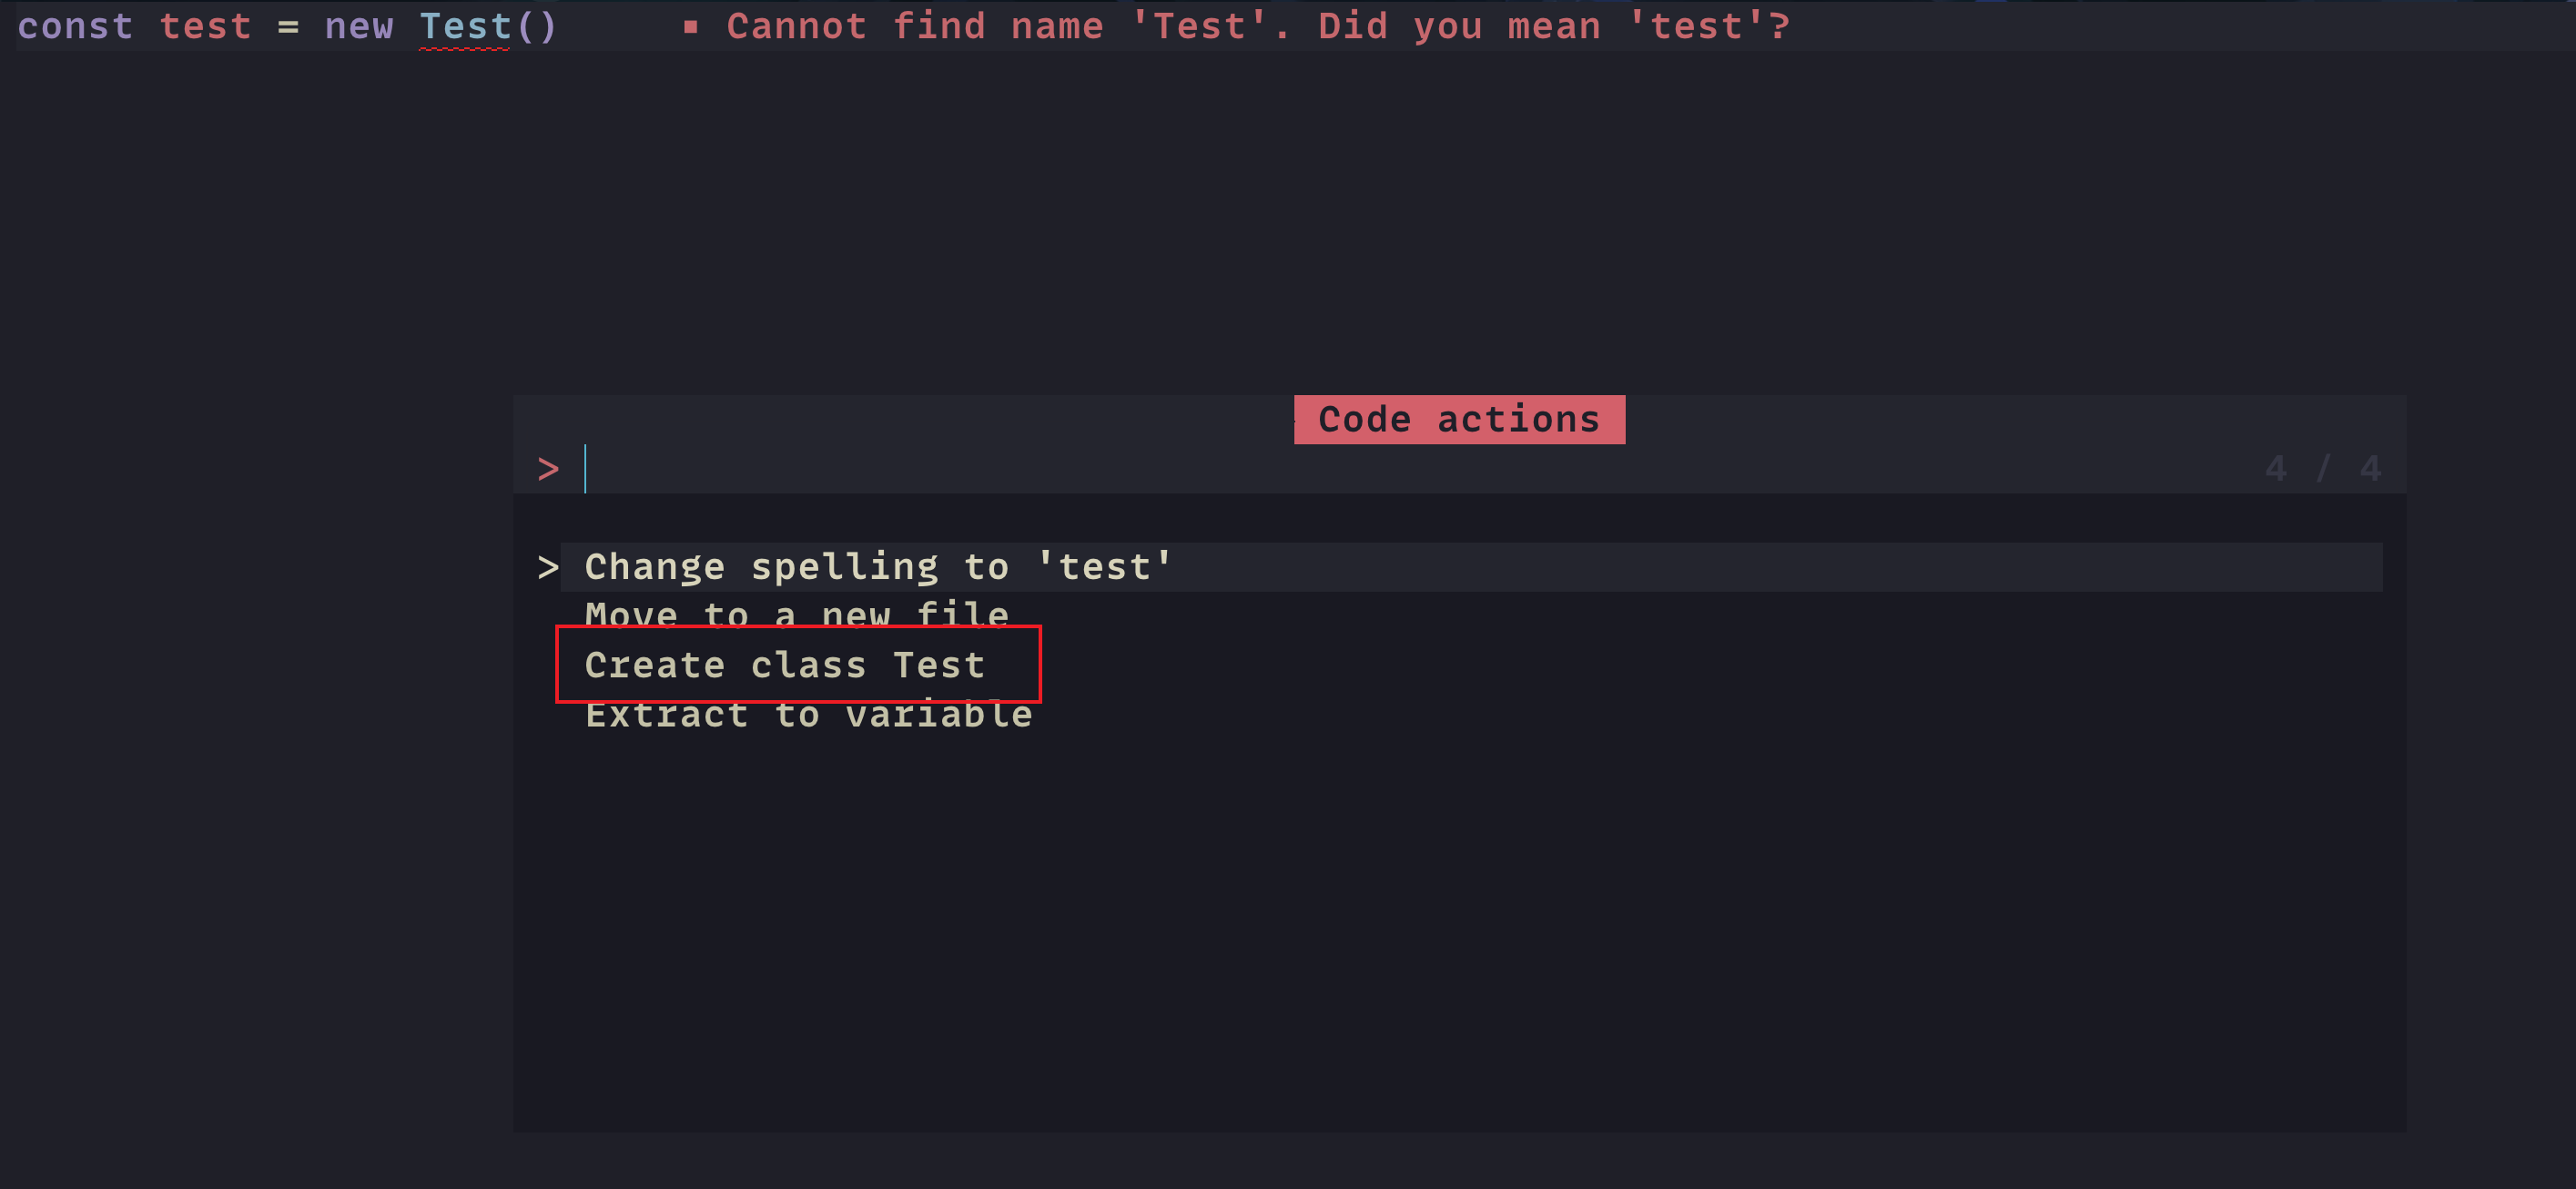
此時我們的 lsp 會顯示出錯誤並給予錯誤訊息為:Cannot find name 'Test'....,我們就可以利用這個訊息當作trigger 來觸發Code Action。
那決定要給哪些Code Action的設定,是被寫在設定ts_ls 的on_attach 參數中,code如下:
lspconfig.ts_ls.setup({
	on_attach = on_attach,
	capabilities = nvlsp.capabilities,
})
因此我們若要新增Code Action 就必須複寫on_attach,位置一樣是寫在 ~/.config/nvim/configs/lsp-config.lua,code如下:
local on_attach = function (client, bufnr) print ("Now lsp server: " .. client.name) if client.name == "ts_ls" then client.server_capabilities.codeActionProvider = { resolveProvider = true , codeActionKinds = { "quickfix" , "refactor" , "refactor.extract" , "refactor.inline" , "refactor.rewrite" , "source" , "source.organizeImports" , } } vim.lsp.buf.code_action = function (options) local params = vim.lsp.util.make_range_params() params.context = { diagnostics = vim.diagnostic.get(0 , { lnum = vim.api.nvim_win_get_cursor(0 )[1 ] - 1 }), only = { "quickfix" , "refactor" , "refactor.extract" , "source" } } client.request('textDocument/codeAction' , params, function (err, result) if err then return end local actions = result or {} local diagnostics = params.context.diagnostics actions = require ('configs.codeActions.ts_create_class' )(diagnostics, actions) setActionUi(actions) end ) end end end local function setActionUi (actions) if #actions > 0 then vim.ui.select (actions, { prompt = 'Code actions:' , format_item = function (action) return action.title end , }, function (action) if not action then return end if action.edit then vim.lsp.util.apply_workspace_edit(action.edit, "utf-8" ) elseif action.command then if type (action.command) == "table" then vim.lsp.buf.execute_command(action.command) else vim.lsp.buf.execute_command(action) end end end ) end end
決定Code Action 內容
依照上面的code,可以發現到其實我把 Code Action 要做的事情 extract 到文章一開始說的codeActions 這個資料夾底下的 ts_create_class.lua 中,以下為該文件之內容:
return function (diagnostics, actions) for _, diagnostic in ipairs (diagnostics) do if diagnostic.message:match ("Cannot find name" ) then local current_line = vim.api.nvim_win_get_cursor(0 )[1 ] local className = diagnostic.message:match ("'([a-hj-zA-HJ-Z][a-zA-Z0-9]*)'" ) if not className then className = diagnostic.message:match ('"([a-hj-zA-HJ-Z][a-zA-Z0-9]*)"' ) end if className then local action = { title = "Create class " .. className, kind = "quickfix" , edit = { changes = { [vim.uri_from_bufnr(0 )] = { { range = { start = { line = current_line - 1 , character = 0 }, ["end" ] = { line = current_line - 1 , character = 0 } }, newText = string .format ([[export class %s { constructor() { } } ]] , className) } } } } } table .insert (actions, action) end end end return actions end
Code 解說
依照上面 ts_create_class.lua 的內容來看,可以拆解以下幾個步驟
判定錯誤訊息是否含有 Cannot find name,若沒有則不加入此 Code Action。
提取出錯誤訊息中 ‘’ 或是 “” 中的字作為 Class Name,若沒有則不加入此Code Action。
定義一個 action 變數,並再這個變數中設定 Code Action 要長出來的Code 的 Template 及相關設定。
最後我們會將這個action 以新增的方式加入預設給定的 Code Action,在這裡他的變數為actions
一路返回至lspconfig.lua 後,並呼叫 function setActionUi
最終結果
經由上述設定後,理論上我們再回到一開始的typescript 檔案中,並對錯誤的地方觸發 Code Action 的指令,就與下圖一樣多出現一個Create class Test 的選項。
選擇後,Code 就會變成這樣囉
export class Test { constructor ( } } const test = new Test ()
Conclusion
以上就是如何自定義 Code Action 的過程,說穿了這整個過程除了學習lua的語法外,主要就還是找出錯誤訊息的pattern 並將其當作條件去判定說 Code Action 是否要加入選項中。當然選擇這個條件可有可無,因為我這邊也有針對extract variable 撰寫了新的Code Action,再這個情境中當然就不會有什麼錯誤訊息囉。
希望這篇文章會幫助到那些被LSP 提供的原生Code Action 限制住的 NeoVim 玩家。
